In the previous post about HTTP Handler, we had understanding on HTTP Handler and its importance.
We will look now on creating the Creating a Custom HTTP Handler in Asp.Net Application.An HTTP handler is code that executes when an HTTP request for a specific resource is made to the server. For example, when a user requests an .aspx page from IIS, the ASP.NET page handler is executed. When an .asmx file is accessed, the ASP.NET service handler is called. You can create your own custom HTTP handlers, register them with IIS, and receive notice when a specific request has been made. This allows you to interact with the request and write your own custom output to the browser.
To create a custom Hypertext Transfer Protocol (HTTP) handler, you first create a class that implements the IHttpHandler interface (to create a synchronous handler) or the IHttpAsyncHandler (to create an asynchronous handler). Both handler interfaces require you to implement the IsReusable property and the ProcessRequest method. The IsReusable property specifies whether the IHttpHandlerFactory object (the object that actually calls the appropriate handler) can place your handlers in a pool and reuse them to increase performance or whether it must create new instances every time the handler is needed. The ProcessRequest method is responsible for actually processing the individual HTTP requests. Once it is created, you then register and configure your HTTP handler with IIS.
As an example, consider the processing of image requests in ASP.NET. Each image in an HTML page requires a separate browser request and a separate response from the Web server. By default, IIS does not pass requests for images to ASP.NET. Instead, IIS simply reads the image file from the file system and sends it directly to the Web browser.
Now, imagine you want to handle requests for images in ASP.NET instead of them just being passed back by IIS. You might need to dynamically generate a chart displaying performance information over a period of time or you might want to dynamically create thumbnails in a photo album application. In these circumstances, you either periodically generate the images in advance or you can create a custom HTTP handler to receive the image requests. It is the latter action on which this example focuses. The following outlines how you can configure ASP.NET (and your custom HTTP handler code) to receive requests for images:
1. Write code to dynamically generate the images.
2. Configure IIS to pass requests for the required image types to ASP.NET.
3. Configure ASP.NET to process requests for files with the required file extensions.
Dynamically Generating Images
The following code demonstrates how you can write an HTTP handler for generating images.
//C#
public class ImageHandler : IHttpHandler
{
public ImageHandler()
{ }
public bool IsReusable
{
get { return false; }
}
public void ProcessRequest(HttpContext context)
{
//set the MIME type
context.Response.ContentType = "image/jpeg";
//TODO: Generate the image file using the System.Drawing namespace
// and then use Context.Response to transmit the image
}
}
Configuring IIS to Forward Requests to ASP.NET
For performance reasons, IIS passes only requests for specific file types to ASP.NET. For example, IIS passes requests for .aspx, .axd, .ascx, and .asmx to the Aspnet_Isapi.dll file that performs the ASP.NET processing. For all other file types, including .htm, .jpg, and .gif, ASP.NET simply passes the file from the file system directly to the client browser.
Therefore, to handle image requests using ASP.NET, you must configure an IIS application mapping from the image file extension you need to the Aspnet_Isapi.dll file. The process of configuring this information is different for IIS 6 and IIS 7. The following steps outline the process for configuring with IIS 7:
1. Open IIS Manager.
2. Expand the nodes until you get to your site or Default Web Site. Select the node for your application.
3. Double-click the Handler Mappings icon in the center pane of IIS Manager.
4. In the Actions pane (right side), select Add Managed Handler.
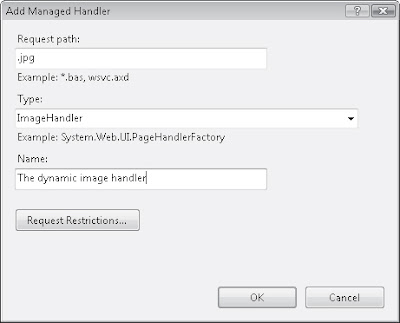
5. In the Add Managed Handler dialog box, shown in Figure 11-1, set the Request path to the file name or extension you wish to map, in this case, .jpg. The Type name is the class name of the HTTP handler. If your HTTP handler is inside the App_Code directory, it will appear in the drop-down list. The Name field is simply a descriptive name.
Configure an application mapping to process image requests in ASP.NET
Once you configure the application extension mapping, all requests for that file type are forwarded to ASP.NET and to your handler. To enable normal image processing in most areas of your Web site, create a separate virtual directory just for dynamically generated images.
Configuring the Handler in Web.config
Alternatively, if you are using IIS 7, you can simply configure the handler for the file extension in your Web.config file. You do not, then, need to use IIS Manager. For each file extension or file name you want to register, create an element in the section of your Web.config file, as the following example demonstrates:
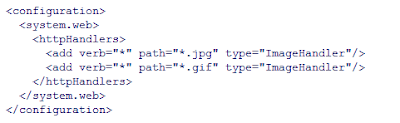
ASP.NET handles requests for files ending in .jpg or .gif by forwarding them to the ImageHandler class. For this to work properly, the ImageHandler assembly must be available in the application’s Bin folder or the source code must be in the App_Code folder.
We will look now on creating the Creating a Custom HTTP Handler in Asp.Net Application.An HTTP handler is code that executes when an HTTP request for a specific resource is made to the server. For example, when a user requests an .aspx page from IIS, the ASP.NET page handler is executed. When an .asmx file is accessed, the ASP.NET service handler is called. You can create your own custom HTTP handlers, register them with IIS, and receive notice when a specific request has been made. This allows you to interact with the request and write your own custom output to the browser.
To create a custom Hypertext Transfer Protocol (HTTP) handler, you first create a class that implements the IHttpHandler interface (to create a synchronous handler) or the IHttpAsyncHandler (to create an asynchronous handler). Both handler interfaces require you to implement the IsReusable property and the ProcessRequest method. The IsReusable property specifies whether the IHttpHandlerFactory object (the object that actually calls the appropriate handler) can place your handlers in a pool and reuse them to increase performance or whether it must create new instances every time the handler is needed. The ProcessRequest method is responsible for actually processing the individual HTTP requests. Once it is created, you then register and configure your HTTP handler with IIS.
As an example, consider the processing of image requests in ASP.NET. Each image in an HTML page requires a separate browser request and a separate response from the Web server. By default, IIS does not pass requests for images to ASP.NET. Instead, IIS simply reads the image file from the file system and sends it directly to the Web browser.
Now, imagine you want to handle requests for images in ASP.NET instead of them just being passed back by IIS. You might need to dynamically generate a chart displaying performance information over a period of time or you might want to dynamically create thumbnails in a photo album application. In these circumstances, you either periodically generate the images in advance or you can create a custom HTTP handler to receive the image requests. It is the latter action on which this example focuses. The following outlines how you can configure ASP.NET (and your custom HTTP handler code) to receive requests for images:
1. Write code to dynamically generate the images.
2. Configure IIS to pass requests for the required image types to ASP.NET.
3. Configure ASP.NET to process requests for files with the required file extensions.
Dynamically Generating Images
The following code demonstrates how you can write an HTTP handler for generating images.
//C#
public class ImageHandler : IHttpHandler
{
public ImageHandler()
{ }
public bool IsReusable
{
get { return false; }
}
public void ProcessRequest(HttpContext context)
{
//set the MIME type
context.Response.ContentType = "image/jpeg";
//TODO: Generate the image file using the System.Drawing namespace
// and then use Context.Response to transmit the image
}
}
Configuring IIS to Forward Requests to ASP.NET
For performance reasons, IIS passes only requests for specific file types to ASP.NET. For example, IIS passes requests for .aspx, .axd, .ascx, and .asmx to the Aspnet_Isapi.dll file that performs the ASP.NET processing. For all other file types, including .htm, .jpg, and .gif, ASP.NET simply passes the file from the file system directly to the client browser.
Therefore, to handle image requests using ASP.NET, you must configure an IIS application mapping from the image file extension you need to the Aspnet_Isapi.dll file. The process of configuring this information is different for IIS 6 and IIS 7. The following steps outline the process for configuring with IIS 7:
1. Open IIS Manager.
2. Expand the nodes until you get to your site or Default Web Site. Select the node for your application.
3. Double-click the Handler Mappings icon in the center pane of IIS Manager.
4. In the Actions pane (right side), select Add Managed Handler.
5. In the Add Managed Handler dialog box, shown in Figure 11-1, set the Request path to the file name or extension you wish to map, in this case, .jpg. The Type name is the class name of the HTTP handler. If your HTTP handler is inside the App_Code directory, it will appear in the drop-down list. The Name field is simply a descriptive name.
Configure an application mapping to process image requests in ASP.NET

Once you configure the application extension mapping, all requests for that file type are forwarded to ASP.NET and to your handler. To enable normal image processing in most areas of your Web site, create a separate virtual directory just for dynamically generated images.
Configuring the Handler in Web.config
Alternatively, if you are using IIS 7, you can simply configure the handler for the file extension in your Web.config file. You do not, then, need to use IIS Manager. For each file extension or file name you want to register, create an

ASP.NET handles requests for files ending in .jpg or .gif by forwarding them to the ImageHandler class. For this to work properly, the ImageHandler assembly must be available in the application’s Bin folder or the source code must be in the App_Code folder.
How about using an HTTP Handler to return xml that has been formatted by xslt? Can you give an example of that?
ReplyDeleteFore more on handlers click here
ReplyDelete