Tuesday, February 22, 2011

Entity Framework Basic - Getting Started


In this post,we will explore regarding the Entity Framework basics, Architecture in detail and its advantages.

Introduction to Entity Framework:
In our daily life in IT industry, we build application for different domains ex.: .Net, Java, etc- . Each application has to relationship database management ex.: Sql Server, Oracle, etc.
If we consider using “.Net” technology, we need to atleast learn 2 different languages (C# and SQL) having different syntax, different type systems, different UI tools, and different paradigm: Object vs. Procedural. We must also learn set of classes and API for communicating with the database i.e.: ADO.NET which is powerful but fragile and time-consuming.

Using ADO.NET, we follow below process:

using (SQLConnection conn = new SQLConnection(“conn”);
{
// “conn” - Parameters loosely bound: -- Names, types, number of not checked until runtimeconn.Open();
SQLCommand cmd = conn.CreateCommand();
cmd.CommandText = “sp_StoredProc”;
cmd.parameters.AddWithValue(“@City”, “Mumbai”);
// ”@City” & “Mumbai” - Strings! No compile time check or Intellisenseusing (SQLDataReader rdr = cmd.ExecuteReader())
{
while (rdr.read())
{
string name = rdr.GetString(0);--- Results are loosely type
string city = rdr.GetString(1);--- Results are loosely type
}
}
}

The main issue so far was:


As shown in above figure, Objects and Relational Data are not related to each other and are not strongly bind with each other.

But, in Entity Framework:


Solution that Entity Framework provides:
1. Data access framework
2. Supports data-centric applications and services
3. Enables programming against a conceptual application Model
4. Enables independency of any data storage engine or Relational schema

Entity Framework Overview:
The ADO.NET Entity Framework seeks to remedy the problem by providing a layer of abstraction between the logical data model and the application domain.


Why Entity Model?
Entity Model is the model used by Entity Framework.
1. Closer to the application problem space
2. Better suited for object oriented programming
3. Supports Inheritance
4. Supports complex types
5. Relationships are more meaningful to the application


What is the Entity Framework?
Released in July 2008, EF is a data access framework from Microsoft that helps bridge the gap between data structures and objects in your applications.


Programming against a Model
1. EF uses a model called an Entity Data Model (EDM)
2. EDM is a client-side data model
3. EDM is an abstraction layer on top of the data storage
4. Remove the pain of a. Interacting with the data storage b. Translating the data into objects


What does it do?

1. Develop against conceptual view of your data, instead of data store itself
2. Automatically generates strongly-typed entity objects that can be
Customized beyond 1-1 mapping
3. Automatically generates mapping/plumbing code
4. Automatically translates LINQ queries to database queries
5. Automatically materializes objects from data store calls
6. Automatically tracks changes, generating updates/inserts
7. Delivers variety of visual modeling tools

What are Entities in Entity Framework?
1. Items described in the EDM are called entities
2. Entities have only properties but no behavior
3. Entities can have relationships with other entities


Entity Framework Architecture:
After having briefly taken a look at Entity data model, we will now get into the details and understand the Entity Framework Architecture.


The above figure architecture, it comprises following layers:

Data Provider:
This is the lowest layer which translates the common SQL languages such as LINQ via command tree to native SQL expression and executes it against the specific DBMS system.

Entity Client:
This layer exposes the entity layer to the upper layer. You can write code to query data using Entity SQL an entity aware language. The entity model is mapped to the database table via mapping specification language and mapping engine. In essence, the entity client provides the ability for developers to work against entities in the form or rows and columns using entity SQL queries without the need to generate classes to represent conceptual schema. The Entity Client shows the entity framework layers which are the core functionality. These layers are called as Entity Data Model as mentioned earlier. The Storage Layer (.ssdl) contains the entire database schema in XML format. The Entity Layer (.csdl) which is also an XML file defines the entities and relationships. Within the application you always work with Conceptual Layer. For this you can use: Entity SQL, LINQ to Entities (Another Language Integrated Query Facility), Object Services. The Mapping layer (.msl) is an XML file that maps the entities and relationships defined at conceptual layer with actual relationships and tables defined at logical layer. The Entity Framework uses all the three XML files to create, update, delete and read operations against entities and relationships. It also supports mapping entities to stored procedures in the data source. The Metadata services which is also represented in Entity Client provides centralized API to access metadata stored in the .csdl, .ssdl, .msl. Object Services: This is the ORM layer of Entity Framework. It represents the data result to the object instances of entities. This services provides rich ORM features like primary key mapping , change tracking etc… Both LINQ and Entity SQL could be used to write query. Within the Object Services layer is the ObjectContext which represents the session of interaction between the applications and the data source. You will primarily use the ObjectContext to query, add, delete instances of entities and to save the changed state back to the database. The Entity Framework uses all the three XML files to create, update, delete and read operations against entities and relationships. It also supports mapping entities to stored procedures in the data source. The Metadata services which is also represented in Entity Client provides centralized API to access metadata stored in the .csdl, .ssdl, .msl.

Object Services:
This is the ORM layer of Entity Framework. It represents the data result to the object instances of entities. This services provides rich ORM features like primary key mapping , change tracking etc… Both LINQ and Entity SQL could be used to write query. Within the Object Services layer is the ObjectContext which represents the session of interaction between the applications and the data source. You will primarily use the ObjectContext to query, add, delete instances of entities and to save the changed state back to the database.

The three parts of Entity Data Model:
Set of objects that describe structure of your business data and map to your underlying data store


The .edmx file is really a combination of three EDM metadata files: the conceptual schema definition language (CSDL), store schema definition language (SSDL), and mapping specification language (MSL) files.

Review ADO .NET Entity Framework

The EDM within the EF:
1. Automatically generates classes from the model
2. Takes care of all of the database connectivity
3. Provides common query syntax for querying the model
4. Provides a mechanism for tracking changes to the model's

When your EDM is created, a file is also added to the project that is auto-generated by a Tool called the EntityModelCodeGenerator, which is used by the ADO.NET Entity Data Model Designer. This tool is called by the Entity Data Model Wizard when you generate your EDM. The file that is created has a file name patterned after the name of your model with the extension of designer.cs. Thus, if you name your model EFDemo, this file will be called EFDemo.Designer.cs. By expanding the different regions in this file you will notice that this file is made up of partial classes that define the contexts and entities used by the EDM. In the Contexts region you will find a partial class that inherits from the ObjectContext class, used to provide facilities for querying and working with entity data as objects

Entity Framework Backend
1. The model doesn't have any knowledge of the data storage
2. The backend data storage has no impact on your model or your code
3. Uses a provider model to interact with the data storage
4. Available providers: a. SQL Server b. Oracle c. MySQL d. Many more


Query Options
Three kinds of queries in EF
1. LINQ to Entities
2. Entity SQL with Object Services
3. Entity SQL with Entity Client

Entity Framework 4.0 Features
1. Plain Old CLR Objects (POCO) support
2. Model-First Support
3. Deferred Loading of Related Objects
4. Functions in LINQ to Entities Queries
5. Plurality Naming Support
6. Complex Type Support


Thanks,
Wednesday, February 16, 2011

Inheritance in Entity Framework - 1

Types of inheritance in Entity Framework

For beginners, please review: Entity Framework Basics
In this blog, I will explore on how to use inheritance in Entity Framework as a part of Advanced Data Models. Basically there are 2 models of Inheritance in Entity Framework and they both actually depend on the database design:

Table-per-Hierarchy Inheritance:
One table in storage schema to maintain data for all the types in an inheritance hierarchy. So, basically there is only one table in database, but different types in Entity model that inherits from a base class and all mapped to that table.

Table-per-Type Inheritance:
Separate table in storage schema to maintain data for each type in the inheritance hierarchy. That means there might have several tables with one-to-one relationships. Each table is mapped to single Entity in the model. But there is a base Entity that is mapped to the very base table.

We will look into Table-per-Hierarchy Inheritance in this blog with example. Generally, Table-per-Hierarchy is type inheritance which is having one table in Database but in Conceptual model of Entity Framework, the Entities are inherited from base Entity. For ex.: Consider real life development scenario, we often have a single table in Database having all the master data in the application ex.: Country, State, City, etc.
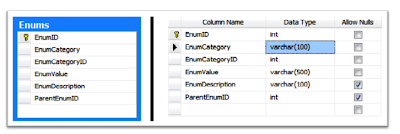
Consider below table which will hold all the master data:


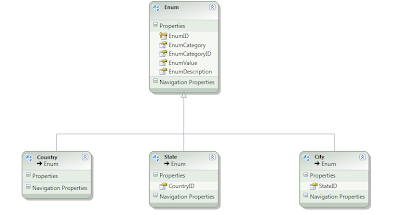
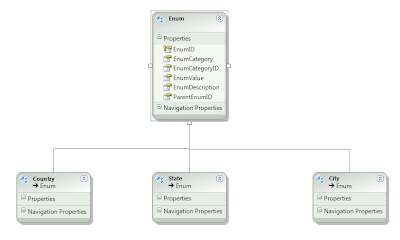
In the above table, we are going to have all the Master Table Data along with parent child relationship among them. But through EF - Table-Per-Hierarchy, we will expose all the Entities to the users providing a level of abstraction. Please refer below figure in Entity Framework:


For one table in Database, we will expose Country, State, City as separate Entities referring to same table. So, let see how to achieve the same in Entity Framework:
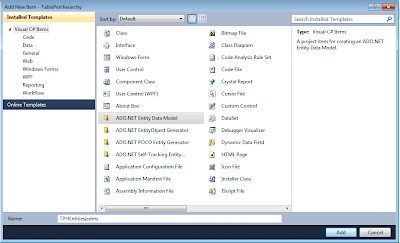
1. First Add New Model in your Project
a. Add New Item by Right Clicking Project,
b. Select Add
c. Add New Item and ADO.NET Entity Data Model


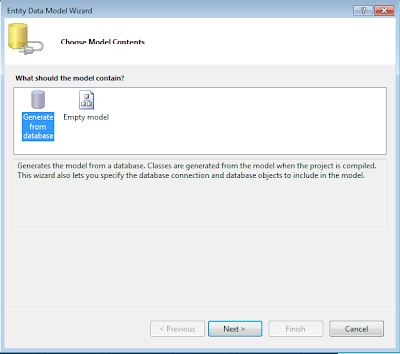
2. Entity Data Model Wizard will open. Select Generate from Database


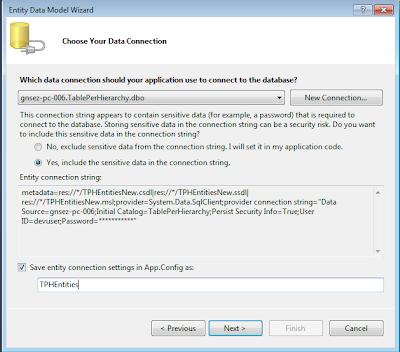
3. Configuration your model and DB:


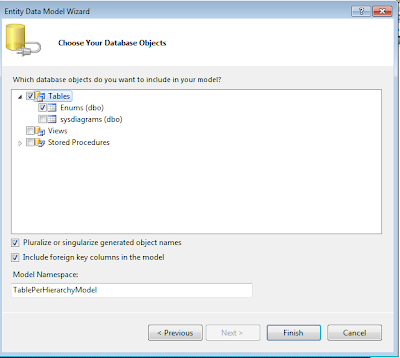
4. Select the Enums Table and Press Finish:


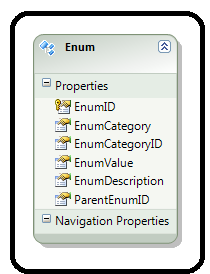
5. You will get the below Entity in Entity Model:


6. Now in Enum Table in Database, we have three Master Category naming Country, State and City having
a. EnumCategoryID = 1 represents Country
b. EnumCategoryID = 2 represents State
c. EnumCategoryID = 3 represents City
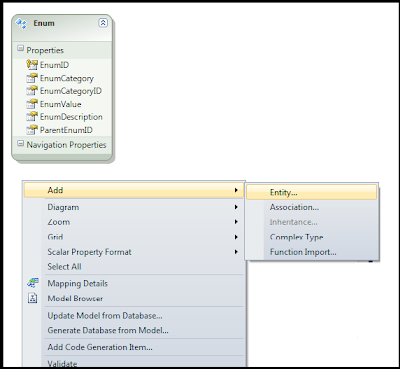
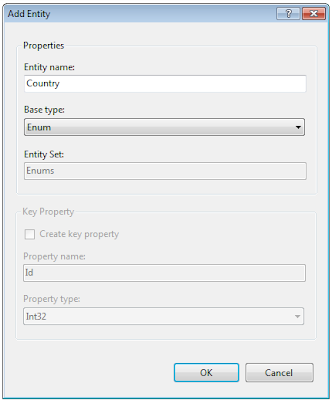
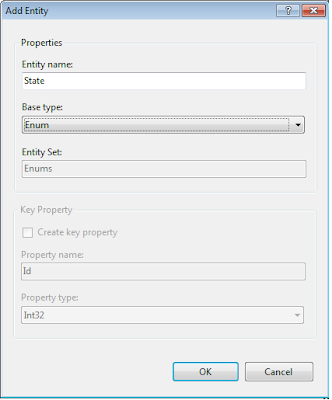
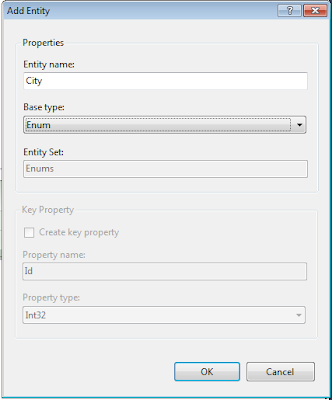
So, first add the Country Entity as shown in below figure:


Do same for State and City Entities:


Once all the Entities are added, the model will look like:


7. Defining Columns in derived Entities.
Now, ParentEnumID is key relating the related records in Enum Table. For ex.: Enum table will contain records of Countries, States and Cities. So, for relationship between Country, State and City, ParentEnumID will be used which will be CountryID in State Entity and StateID in City Entity. So, Add Scalar Property CountryID in State and StateID in City Entity.
In order to add new Scalar Property,
a. Select “State” Entity, right click
b. Click Add --> Scalar Property.
Please note that Scalar Property should have the same data type as that in Base Table.
In our ex.: ParentEnumID is int, so Country ID and State ID will be int only.
Once your columns are added the model should look like:


8. Define Table Mappings:
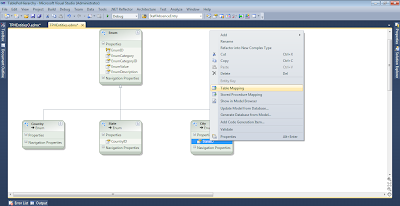
Earlier I mentioned that EnumCategoryID is used to identity each Entity namely Country, State and City. For example EnumCategoryID= 1 represents that Entity is Country. Moreover, we need to map CountryID in State entity and StateID in City entity to ParentEnumID in Enum entity. So, let us now add Table mapping.
For adding Table Mapping, select Entity, Right click and select Table mapping as shown in figure:


Then, for Country, add Condition EnumCategoryID = 1, as there would be no ParentEnumID for Country, we will leave it blank.


For State, add Condition EnumCategoryID =2, in ColumMappings map ParentEnumID to CountryID


For City, add Condition EnumCategoryID =3, in ColumMappings map ParentEnumID to StateID


Once you are done, please don’t forget to delete the ParentEnumID and EnumCategoryID property from Enum Entity as it is not needed anymore.

9. Define An Abstract Class:
As I mentioned earlier, for demonstration I need to set Enum Entity as Abstract. However you can still define a mapping for it instead of making it abstract. You should set an Base Entity as Abstract only if you know there will be no direct instantiation from that Entity. For the case here, I would be having only Country, State and City entities. There is no simple Enum.
To set an Entity as Abstract:
1. Right Click on the Enum Entity, select Properties form context menu.
2. From Properties window and Under Code Generation group, set Abstract property to True. Click Ok on the confirmation message that appears.

Conclusion:
Let see what is exacting happing in the Model by exploring Conceptul Model, Storage Model and Mapping Model:
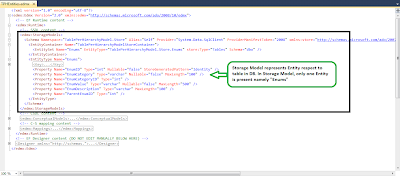
a. Storage Model


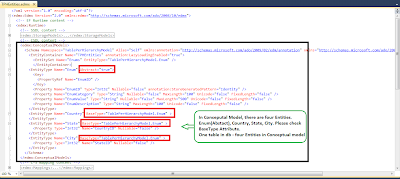
b. Conceptual Model


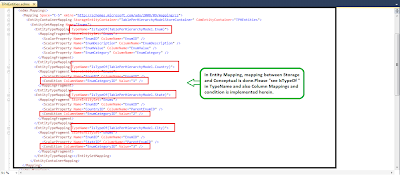
c. Mapping Model:


Find the sample code. And in few days, I will publish post on using the Table per Hierarchy in the Application with CRUD operations and Table-Per-Type example and explanation.

Thanks,
Paras Sanghani


TablePerHierarchy

Tuesday, February 15, 2011

Creating a Custom HTTP Handler

In the previous post about HTTP Handler, we had understanding on HTTP Handler and its importance.

We will look now on creating the Creating a Custom HTTP Handler in Asp.Net Application.An HTTP handler is code that executes when an HTTP request for a specific resource is made to the server. For example, when a user requests an .aspx page from IIS, the ASP.NET page handler is executed. When an .asmx file is accessed, the ASP.NET service handler is called. You can create your own custom HTTP handlers, register them with IIS, and receive notice when a specific request has been made. This allows you to interact with the request and write your own custom output to the browser.

To create a custom Hypertext Transfer Protocol (HTTP) handler, you first create a class that implements the IHttpHandler interface (to create a synchronous handler) or the IHttpAsyncHandler (to create an asynchronous handler). Both handler interfaces require you to implement the IsReusable property and the ProcessRequest method. The IsReusable property specifies whether the IHttpHandlerFactory object (the object that actually calls the appropriate handler) can place your handlers in a pool and reuse them to increase performance or whether it must create new instances every time the handler is needed. The ProcessRequest method is responsible for actually processing the individual HTTP requests. Once it is created, you then register and configure your HTTP handler with IIS.
As an example, consider the processing of image requests in ASP.NET. Each image in an HTML page requires a separate browser request and a separate response from the Web server. By default, IIS does not pass requests for images to ASP.NET. Instead, IIS simply reads the image file from the file system and sends it directly to the Web browser.

Now, imagine you want to handle requests for images in ASP.NET instead of them just being passed back by IIS. You might need to dynamically generate a chart displaying performance information over a period of time or you might want to dynamically create thumbnails in a photo album application. In these circumstances, you either periodically generate the images in advance or you can create a custom HTTP handler to receive the image requests. It is the latter action on which this example focuses. The following outlines how you can configure ASP.NET (and your custom HTTP handler code) to receive requests for images:

1. Write code to dynamically generate the images.
2. Configure IIS to pass requests for the required image types to ASP.NET.
3. Configure ASP.NET to process requests for files with the required file extensions.

Dynamically Generating Images
The following code demonstrates how you can write an HTTP handler for generating images.

//C#
public class ImageHandler : IHttpHandler
{
public ImageHandler()
{ }

public bool IsReusable
{
get { return false; }
}

public void ProcessRequest(HttpContext context)
{

//set the MIME type
context.Response.ContentType = "image/jpeg";
//TODO: Generate the image file using the System.Drawing namespace
// and then use Context.Response to transmit the image
}
}

Configuring IIS to Forward Requests to ASP.NET
For performance reasons, IIS passes only requests for specific file types to ASP.NET. For example, IIS passes requests for .aspx, .axd, .ascx, and .asmx to the Aspnet_Isapi.dll file that performs the ASP.NET processing. For all other file types, including .htm, .jpg, and .gif, ASP.NET simply passes the file from the file system directly to the client browser.

Therefore, to handle image requests using ASP.NET, you must configure an IIS application mapping from the image file extension you need to the Aspnet_Isapi.dll file. The process of configuring this information is different for IIS 6 and IIS 7. The following steps outline the process for configuring with IIS 7:

1. Open IIS Manager.
2. Expand the nodes until you get to your site or Default Web Site. Select the node for your application.
3. Double-click the Handler Mappings icon in the center pane of IIS Manager.
4. In the Actions pane (right side), select Add Managed Handler.
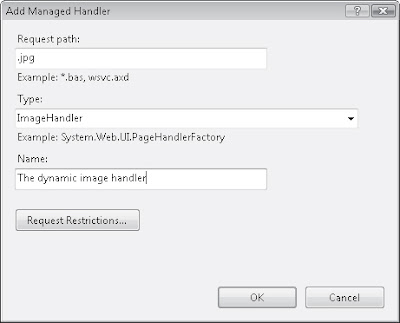
5. In the Add Managed Handler dialog box, shown in Figure 11-1, set the Request path to the file name or extension you wish to map, in this case, .jpg. The Type name is the class name of the HTTP handler. If your HTTP handler is inside the App_Code directory, it will appear in the drop-down list. The Name field is simply a descriptive name.


Configure an application mapping to process image requests in ASP.NET


Once you configure the application extension mapping, all requests for that file type are forwarded to ASP.NET and to your handler. To enable normal image processing in most areas of your Web site, create a separate virtual directory just for dynamically generated images.

Configuring the Handler in Web.config
Alternatively, if you are using IIS 7, you can simply configure the handler for the file extension in your Web.config file. You do not, then, need to use IIS Manager. For each file extension or file name you want to register, create an element in the section of your Web.config file, as the following example demonstrates:


ASP.NET handles requests for files ending in .jpg or .gif by forwarding them to the ImageHandler class. For this to work properly, the ImageHandler assembly must be available in the application’s Bin folder or the source code must be in the App_Code folder.


The HTTP Handler

An HTTP handler is code that executes when an HTTP request for a specific resource is made to the server. For example, when a user requests an .aspx page from IIS, the ASP.NET page handler is executed. When an .asmx file is accessed, the ASP.NET service handler is called.An HTTP handler component is an instance of a class that implements the IHttpHandler interface. This component is a pillar of the ASP.NET runtime architecture. Here’s the defnition of the interface:

//C#
public interface IHttpHandler
{
public void ProcessRequest(HttpContext context) ;
public bool IsReusable;
}

The name of the method ProcessRequest says it all about the intended semantics. It takes the context of the request as the input and ensures that the request is serviced. In the case of synchronous handlers, when ProcessRequest returns, the output is ready for forwarding to the client. (It is not of primary importance here, but HTTP handlers can also work asynchronously according to the methods in the IHttpAsyncHandler interface.)

In Visual Studio, you build an ASP.NET application as a collection of Web Forms pages. Each page consists of two fles: an .aspx markup fle describing the expected HTML template and a C# (or Visual Basic) class file that contains postback handlers and any ancillary methods.

Where’s the HTTP handler, then? Who writes the HTTP handler for each and every ASP.NET request that originates within an application? Is the Web Forms model really centered on the concept of an HTTP handler?

The answer is in the underlying design pattern used to implement the Web Forms model.
Known as Page Controller, the pattern suggests that you arrange the processing of an HTTP request around the concept of the page. Processing the request is a task that goes through a number of steps, such as instantiating the page, initializing the page, restoring the page’s state, updating the page, rendering the page, and unloading the page. In the implementation of the pattern, you start from a base page class and define a strategy to process the request—the page life cycle. In the implementation of the page life cycle,you come up with an interface of virtual methods and events that derived pages will have to override and handle. Derived page classes are known as code-behind classes in ASP.NET jargon.

In ASP.NET, the base page class is System.Web.UI.Page and, guess what, most of what it does is implement the IHttpHandler interface. (See Figure Below Figure)


You can create your own custom HTTP handlers, register them with IIS, and receive notice when a specific request has been made. This allows you to interact with the request and write your own custom output to the browser. Please check Creating Custom HTTP Handlers.


Monday, February 14, 2011

Application Domain and its configuration (Part-1)

In .net all application assembly run under an application domain that is created by default for each application, we don’t need to create it. Common Language Runtime does it for application.

Developers often need to run an external assembly. However, running an external
assembly can lead to inefficient resource usage and security vulnerabilities. The best way to manage these risks is to create an application domain and call the assembly from within the protected environment.

Application domain is logical unit to run different application in a single process. IIS is the very good example of it, in IIS more than one website or application are hosted, still they run independent with out interfering to any other application, hosted on same IIS.

Application domain creates a separate layer for application; .net run time is responsible for the various application runtime, while operating system manage process. In a process, we can run more than one application domain and each application domain has one or more assembly, application running. Each of these application domains can’t access resource or memory used by another application domain.

To create an application domain is as simple as we create an object of a class. The benefit of application domain is that when we don’t require or our work has been completed we can unload resource occupied by application runtime.

System.AppDomain class provides many methods and property to manipulate application domain.

1. Create an application domain

AppDomain ad = new AppDomain(“myAppDomain”);

We can run our assembly under this newly created Application domain.

ad.ExecuteAssembly(“myAssembly.exe”);

We can either call ExecuteAssemblyByName method to run assembly, in that case we need to pass name of assembly.

ad.ExecuteAssembly(“myAssembly.exe”);

There are so many properties and methods provide by AppDomain which gives ability to specify ID to process, friendlyname etc. Methods like Load, ApplyPolicy,CreateIntance etc.

If you notice in above code, we don’t have any constructor to create application domain, we are using static method of AppDomain class.

We can access current domains by ..

AppDomain myCurrentDomain = AppDomain.CurrentDomain;

To unload application domain, call Unload method of AppDomain

AppDomain.Unload(ad);

Threading Part - 2


This post is in continuation with Threading Part - 1....

In first post, we have seen the basic understanding on the Threading and its usage.
Now, let us consider comparatively complex scenarios....

Using Thread.Join
More often than not, you will need your application to wait for a thread to complete
execution. To accomplish this, the Thread class supports the Join method:

// C#
theThread.Join();

The Join method tells the system to make your application wait until the thread has
completed. Of course, in this simple case you do not really need a second thread
because you are just waiting for it to complete anyway. A better example is for us to
have five threads that all do some work and to wait for them. When we are working
with multiple threads, our programming task is a bit more complicated, as we need to
wait for all our threads. We can do this by keeping a reference to all our threads and calling Join on each of the threads to wait for the threads to complete, one at a time,as demonstrated in the following code:

// C#
ThreadStart operation = new ThreadStart(SomeWork);
Thread[] theThreads = new Thread[5];
for (i nt x = 0; x < 5; ++x)
{
// Creates, but does not start, a new thread
theThreads[x] = new Thread(operation);
// Starts the work on a new thread
theThreads[x].Start() ;
}
// Wai t for each thread to complete
foreach (Thread t in theThreads)
{
t.Join();
}
By storing the threads in an array, we can wait for each of the Threads one at a time. As each thread completes, the Join method will return and we can continue.

Thread Priority
The Thread class supports the setting or getting of the priority of a thread using the ThreadPriority enumeration.

  1. Highest - The highest priority
  2. AboveNormal - Higher priority than Normal
  3. Normal - The default priority
  4. BelowNormal - Lower than Normal
  5. Lowest - The lowest priority


Threads are scheduled based on this enumeration. In most cases, you will want to use
the default (Normal). Deciding to use threads that have lower thread priority can
cause the operation system to starve a thread more than you might expect, or if you
use higher priorities (especially Highest), you can starve the system. Although it is necessary to use non-Normal thread priorities at times, make this decision with much caution. Increasing the performance of a system simply by increasing thread priority is not likely to help in the long term, as other starved threads tend to back up and cause unexpected consequences.

Passing Data to Threads
In each of the earlier examples, we were using the ThreadStart delegate, which takes
no parameters. In most real-world use of threading, you will need to pass information
to individual threads. To do this, you need to use a new delegate called ParameterizedThreadStart. This delegate specifies a method signature with a single parameter of type Object and returns nothing. The following code snippet provides an example:

// C#
static void WorkWithParameter(object o)
{
string i nfo = (string) o;
for (int x = 0; x < 10; ++x)
{
Console. WriteLine("{0}: {1}", i nfo,
Thread.CurrentThread.ManagedThreadId);
// Slow down thread and let other threads work
Thread. Sleep(10);
}
}

This is a method that takes a single Object parameter (and therefore can be a reference to any object). To use this as the starting point of a thread call, you can create a ParameterizedThreadStart delegate to point at this new method and use the Thread.Start method’s overload that takes a single object parameter. The following code snippet provides an example:

// C#
ParameterizedThreadStart operation = new ParameterizedThreadStart(WorkWithParameter);
// Creates, but does not start, a new thread
Thread theThread = new Thread(operation);
// Starts the work on a new thread
theThread.Start("Hel l o");
// A Second Thread wi th a different parameter
Thread newThread = new Thread(operation);
newThread.Start("Goodbye");

Be aware that because the WorkWithParameter method takes an object, Thread. Start
could be called with any object instead of the string it expects. Being careful in choosing your starting method for a thread to deal with unknown types is crucial to good threading code. Instead of blindly casting the method parameter into our string, it is a better practice to test the type of the object, as shown in the following example:
// C#
string i nfo = o as string;
if (info == null )
{
throw Invali dProgramException("Parameter for thread must be a string");
}

Threading Part - 1


Most of the time developer chooses to develop program in linear way. In this mechanism user would need to wait sometime in some situation like application is going to download page from server, application is going to print document, applications is going to access remote database. Those cases are time consuming, user needs to wait till main thread completes work, sometime user get frustrated by response time, and application does not response to user till task has been completed.
To overcome, .net has provided threading mechanism. Our main thread executes as and in background we can execute process. So user will not feel that application is not responding, in background thread method executes and once result will be available, it would be shown to user.

Threading means in a single process execute more than one task among different processors. Now days most of computers are more than one core, we can use another core when main core is busy to complete task. We can distribute work task among different processors.

Though multithreading seems to be very complex, .net has provided a simple way to implement in programming. At a time there can be more than 250 threads run in back ground. We can even change it to more if required.

To work with thread we need to add System.Threading namespace to our application.

Creating a Thread
To create and start a new thread, follow these steps:
1. Create a method that takes no arguments and does not return any data (for example, use the void return type for C#). This method should look something like this:

// C#
static void SimpleWork()
{
Console. WriteLine("Thread: {0}", Thread. CurrentThread. ManagedThreadId);
}
2. Create a new ThreadStart delegate, and specify the method created in step 1.
3. Create a new Thread object, specifying the ThreadStart obj ect created in step 2.
4. Call Thread.Start to begin execution of the new thread.
Your code will end up looking something like this:

// C#
ThreadStart operation = new ThreadStart(SimpleWork);
// Creates, but does not start, a new thread
Thread theThread = new Thread(operation);
// Starts the work on a new thread
theThread.Start();

When the Start method is called, the SomeWork method is called on a new thread and
the thread executes until the method completes. In this example, our SimpleWork
method writes the phrase “In Thread” and shows the ManagedThreadId property. This
property is a numeric number assigned to every thread.

Using Multiple Threads
A more likely scenario than this simple case is one in which you’ll want to create
multiple threads to do work. For example, we can change the example just shown to
create multiple threads and start them all on the same work:
// C#
ThreadStart operation = new ThreadStart(SimpleWork);
for (i nt x = 1; x <= 5; ++x)
{
// Creates, but does not start, a new thread
Thread theThread = new Thread(operation);
// Starts the work on a new thread
theThread.Start();
}

This executes the work on five separate threads, as concurrently as your particular
machine is capable of doing. If we implement this change, we should get five separate
threads all writing out their own thread ID to the console window:
Thread: 3
Thread: 4
Thread: 5
Thread: 6
Thread: 7

We see consecutive thread numbers because the work we are doing in SimpleWork is
very quick. Let’s change our work to something a little more lengthy so that we can
see the threads working concurrently:

// C#
static void Simpl eWork()
{
for (int x = 1; x <= 10; ++x)
{
Console. WriteLine("Thread: {0}",
Thread.CurrentThread.ManagedThreadId);
// Sl ow down thread and let other threads work
Thread.Sl eep(10);
}
}

In this new version of SimpleWork, we are writing out our thread identifier 10 times.
In addition, we are using Thread.Sleep to slow down our execution. The Thread.Sleep
method allows us to specify a time in milliseconds to let other threads perform work.
On every thread, we are allowing 10 milliseconds for the other threads to write their
own data to the console. To see how this works, we can change our SimpleWork method to write out the iteration it is working on:

Thread: 3
Thread: 4
Thread: 5
Thread: 6
Thread: 7
Thread: 3
Thread: 4
Thread: 5
Thread: 6
Thread: 7

Doing this allows us to perform operations as concurrently as our hardware will
allow. As our work increases and the time it takes to complete each thread becomes longer, we will need to determine how to make our main thread (the one that the thread creation code exists on) wait until all the work is complete. This is where the Thread.Join method comes in.


Thread which runs first is called Forground and other called background.

static void ThreadProc(object msg)
{
string threadMsg = (string)msg;
if (Thread.CurrentThread.IsBackground)
{
Console.WriteLine(“Background Thread”);
Console.WriteLine(“My Threading method with:” + threadMsg);
}
else
{
Console.WriteLine(“Forground Thread”);
Console.WriteLine(“My Threading method with:” + threadMsg);
}
}
We can check weather thread is background or not with Thread.CurrentThread.IsBackGround property.
Some time threading also overheads on processors, so need to take care while implementing threading as it distribute loads to different processor, more memory is required to manage resource.
Wise use of threading may improve application’s performance. It depends on requirement and application problem to use of Threading.

Wednesday, February 2, 2011

Microsoft Community Contritor Award 2011


I would like to take opportunity to thank all readers for making my blogs successful and I have been awarded as Microsoft Community Contributor Award 2011. I thanks Microsoft for providing such honour to me and also thanks all my friends who are marking my posts as Answers and blog readers.......


The begining of year 2011 has been very successful for me. I believe this award as achievement in life and may this year will bring success to all of you. I would like to tell all my friends and readers to start blogging. I have seen quite intelligent IT Professionals and Excepectional Developers are not blogging....I would like to encourage them to start blogging immediately because unless and until you don’t blog community will not know what you are doing.

My Msdn Profile

Thanks,
Have happy blogging and programming

Tuesday, February 1, 2011

Sending Emails in C#.Net


Hi Friends,
This post is regarding "Sending email", its configuration and samples.

How to Send a Message using C#.NET?
Once you create a message, you need to send it through an SMTP (Simple Message Transfer Protocol) server, which in turn will forward it to the recipient. In the .NET Framework, the SmtpClient class represents the SMTP server. Most of the time, sending a message is as simple as this sample code (where "smtp.contoso.com" is the name of the local SMTP server):
' VB
Dim m As MailMessage = New MailMessage _
("jane@contoso.com", _
"ben@contoso.com", _
"Quarterly data report.", _
"See the attached spreadsheet.")
Dim client As SmtpClient = New SmtpClient("smtp.contoso.com")
client.Send(m)
// C#
MailMessage m = new MailMessage
("jane@northrup.org",
"ben@northrup.org",
"Quarterly data report.",
"See the attached spreadsheet.");
SmtpClient client = new SmtpClient("smtp.contoso.com");
client.Send(m);

How to Configure Credentials
Next is to configure the Credentials. i.e.: UserName, Password, SMTP Settings.
To reduce spam, all SMTP servers should reject messages from unauthorized users when the message recipients are not hosted by the SMTP server. SMTP servers provided by ISPs typically determine whether a user is authorized based on the user's IP address; if you are part of the ISP's network, you are allowed to use the SMTP server.
Other SMTP servers (and some ISP SMTP servers) require users to provide a valid username and password. To use the default network credentials, set SmtpClient.UseDefaultCredentials to True. Alternatively, you can set SmtpClient.Credentials to CredentialCache.DefaultNetworkCredentials (in the System.Net namespace), as the following code demonstrates:
' VB
Dim client As SmtpClient = New SmtpClient("smtp.contoso.com")
client.Credentials = CredentialCache.DefaultNetworkCredentials
// C#
SmtpClient client = new SmtpClient("smtp.contoso.com");
client.Credentials = CredentialCache.DefaultNetworkCredentials;
To specify the username and password, create an instance of the System.Net.NetworkCredential class and use it to define SmtpClient.Credentials. The following example shows hard-coded credentials; however, you should always prompt the user for credentials:
' VB
Dim client As SmtpClient = New SmtpClient("smtp.contoso.com")
client.Credentials = New NetworkCredential("user", "password")
// C#
SmtpClient client = new SmtpClient("smtp.contoso.com");
client.Credentials = new NetworkCredential("user", "password");

Settings the Port No:
You might need to set the port no,

How to attach files?

To attach a file, add it to the MailMessage.Attachments AttachmentCollection by calling the MailMessage.Attachments.Add method. The simplest way to add a file is to specify the file name:
MailMessage m = new MailMessage();
m.Attachments.Add(new Attachment(@”C”\Tes.jpg”));
You can also specify MIME(Multipurpose Internet Mail Extensions) content type using the System.Net.Mime.MediaTypeNames enumeration. There are special MIME types for text and images, but you will typically specify MediaTypeNames.Application.Octet. The following code sample(which requires System.IO and System.Net.Mime in addition to System.Net.Mail) demonstrates how to use a Stream as a file attachment and how to specify the MIME type:
MailMessage m = new MailMessage();
Stream sr = new FileStream(@”C:\Test.txt”, FileMode.Open, FileAccess.Read);
m.Attachments.Add(new Attachment(sr, “testimage.txt”, MediaTypeNames.Application.Octet )

How to Create HTML E-mails?
To created an HTML e-mail message, supply HTML-tagged content for MailMessage.Body and set the MailMessage.IsBodyHtml attribute to True

Code Sample:

MailMessage m = new MailMessage();
m.From = new MailAddress("lance@contoso.com","Lance Trucker");
m.To.Add(new MailAddress("burke@contoso.com", "Burke Fewel"));
m.Subject = "Testing HTML";

//Specify an HTML message Body
m.Body = "HTML Tags...";
m.IsBodyHtml = true;

//send the message
SmtpClient client = new SmtpClient("smtp.contoso.com");
client.Send(m);

Thursday, January 6, 2011

Entity Framework vs. LINQ to SQL(edmx vs dbml)

Hi Friends,


This post is regarding the difference between LINQ to SQL vs. Entity Framework.
Both are introduced as latest technologies and at times a bit confusing when to use which. Entity Framework and LINQ to SQL have a lot in common but still different from each other in quite a few ways:

Entity Framework:
1. Enterprise Development
2. Works with Conceptual model of database
3. Works with all data sources
4. ".EDMX" is created while using Entity Framework

LINQ:
1. Rapid Application Development
2. Works with objects in database
3. Mainly woks with SQL Server
4. ".dbml" is created while using LINQ to SQL

Entity Framework is more targeted towards Enterprise Development where the schema is usually optimized for storage considerations like performance consistency and partitioning. Entity Framework is designed around exposing an application-oriented data model that is loosely coupled and may differ from the existing database schema. For example, you can map a single entity (class) to multiple or map multiple entities to the same table. Entity Framework has “.edmx” (ADO.NET Entity Model) file when added in the application.

LINQ to SQL mainly has features to support Rapid Application Development against SQL Server. LINQ to SQL allows you to have a strongly typed view of your existing database schema. You can build LINQ queries over tables and return results as strong typed objects. LINQ to SQL has “.dbml”(LINQ to SQL) file when added in the application. You can use LINQ to SQL by decorating the existing classes with the attributes.

Please review: Entity Framework Basics

Thanks,
Paras Sanghani